Get Crafty with DAP for the Holidays

It's that magical time of year when we're all itching to deck the halls — but why settle for store-bought when you can create something truly special? With a sprinkle of creativity (and the right tools), you can craft Christmas magic that even Santa would envy.
The best part? You can use DAP products you might already have at home. These DIY projects are equal parts charming and practical — perfect for adding festive flair to your home or whipping up a unique gift.
Let's roll up our sleeves, channel our inner elves, and get crafting — holiday cheer awaits!
DIY SNOW GLOBE
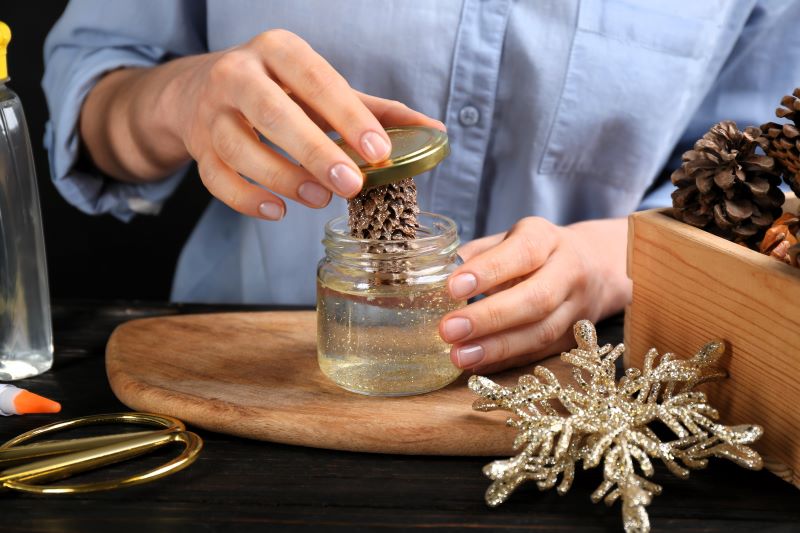
A glittering snow globe is the perfect mix of whimsy and nostalgia — plus, it’s a fantastic stocking stuffer for kids and adults alike! Just customize it with figurines that fit their personality or interests.
We adore this tutorial by The Sweetest Occasion, but here’s our tip: swap out epoxy adhesives for our SILICONE ULTRA All-Purpose Waterproof Sealant. If it’s strong enough to hold water in aquariums, you can trust it to keep your snow globe leak-free and lasting for years to come!

What You’ll Need
- SILICONE ULTRA All-Purpose Waterproof Sealant
- A Mason Jar
- Miniature Figurines
- Distilled Water
- Glycerine
- Glitter
How To
- Start with a clean mason jar. Using SILICONE ULTRA Sealant, attach a mini reindeer, tiny house, or any adorable figurine to the inside of the lid. The cuter, the better! Get creative —the options for your magical scene are endless. Allow the sealant to cure for 24 hours to ensure everything stays securely in place.
- Fill the jar with water, leaving about a finger’s width of space at the top. Add a few drops of glycerin to help the glitter float gently, like a soft snowfall, then stir in your favourite glitter.
- Apply a bead of SILICONE ULTRA Sealant around the inner rim of the lid. Carefully invert the lid onto the jar and screw it on tightly. Resist the urge to shake your creation just yet — let the sealant set for 24 hours for a watertight seal.
- Once cured, give it a shake and bask in the brilliance of your handmade snow globe!
DIY TEXTURED WALL ART
Create textured art using ALEX PLUS Spackling to bring festive flair into your home with a modern twist. This versatile material lets you add depth and dimension to your holiday decor.
Whether on canvas or other sturdy surfaces like the wooden disks featured in Dwijaa, XO's tutorial, you can design anything your heart desires. A Christmas tree or wreath makes for a perfect seasonal centrepiece, but feel free to explore snowflakes, ornaments, or even abstract winter scenes.
What You’ll Need
- ALEX PLUS Spackling
- White School Glue
- Canvas or Wooden Board
- Putty Knife
- Craft Paint – find inexpensive acrylic paints at the dollar store or craft store
- Paint Brushes
- Gold Accents or Glitter
How To
- Mix ALEX PLUS Spackling with white glue to create what Dwijaa calls "texture paste." This mixture helps thin out the spackling, making it more suitable for your artistic endeavours. For best results, she suggests a ratio of 4 parts spackling to 1 part glue, though you can adjust it to achieve your preferred consistency.
- Use your putty knife to build and shape your masterpiece. Depending on the thickness of the layer you’ve applied, the drying time for ALEX PLUS Spackling may be longer than usual. Be patient and allow it to dry fully before proceeding to the next step.
- Channel your inner Picasso and paint your creation! Once the texture paste has dried, feel free to use sandpaper to buff away any excess or smooth the surface of your artwork. For added dimension, consider incorporating glitter or glid the edges with metallic paints to give your piece a festive sparkle. Step back to admire your masterpiece, then hang it proudly—it’s basically modern art!
DIY CHRISTMAS ORNAMENTS
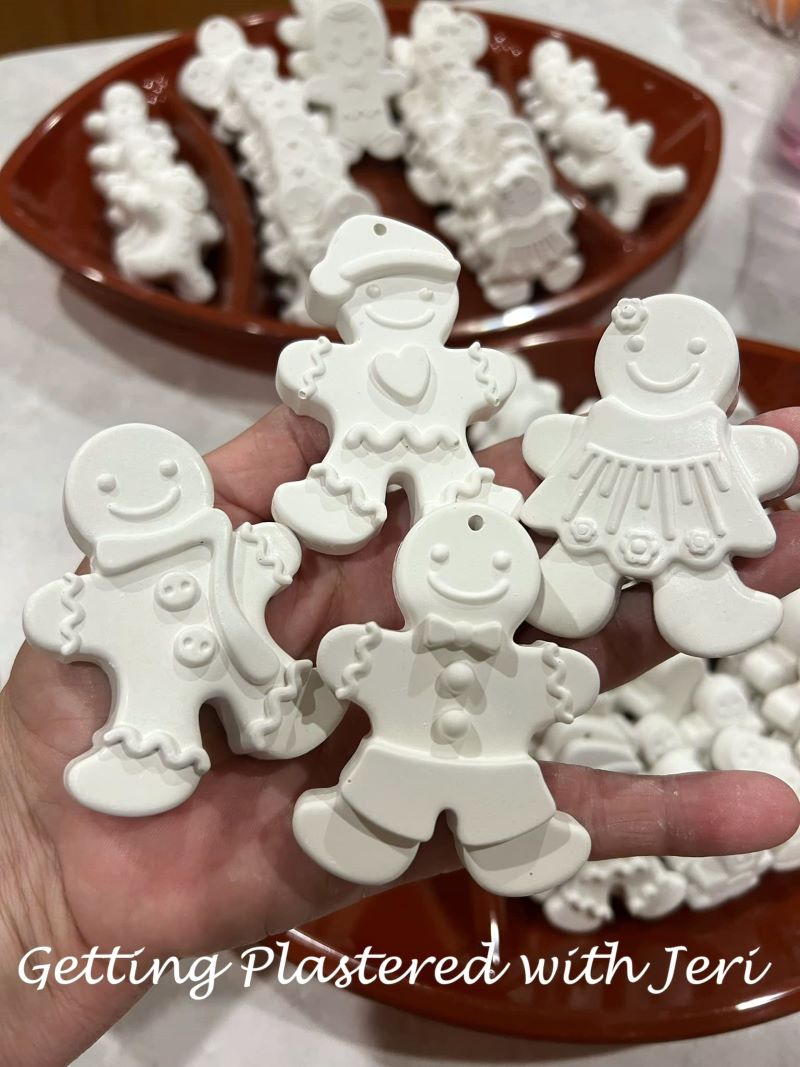
What’s better than a handmade Christmas ornament? We’re obsessed with Getting Plastered with Jeri’s festive creations! The queen of Plaster of Paris has shared her step-by-step tutorial, showing you how to craft any ornament you can dream up—find the right mould, and you’re ready to go!

What You’ll Need
- Plaster of Paris
- Water
- Silicone Moulds – makes for easy removal
- Drill with a Small Bit
- Soft Sanding Sponge – sandpaper or nail file will also work
- Brush
- Paint – acrylic or craft paint works well
- Small Paint Brushes
- Gloss Varnish
- String, ribbon, or twine
How To
- In a mixing bowl, combine 2 parts Plaster of Paris with 1 part water. Stir thoroughly until the mixture is smooth and slightly thicker than pancake batter.
- Spoon the plaster mixture into your silicone moulds, making sure to fill them evenly. Gently tap the moulds on the counter to spread the plaster and pop any sneaky air bubbles.
- Allow the plaster to dry completely. This typically takes a few hours, but drying time may vary based on the mould size and room temperature. Once dry, carefully remove the ornaments from the silicone moulds.
- Using a small drill bit, carefully drill a hole near the top of the ornament for hanging. Make sure it’s big enough to fit a ribbon or string but small enough to keep your ornament looking festive and neat.
- Lightly sand the edges and surface of the ornament to smooth out any rough areas. Use a brush to remove the sanding dust.
- Now, the fun part—painting! Let your creativity shine with festive colours, intricate patterns, or even a personal touch. Whether you choose classic red and green or a modern metallic vibe, the sky’s the limit!
- Once your paint is fully dry, apply three thin layers of gloss varnish to give your ornament a sleek, shiny finish. Let each layer dry before adding the next—it’s worth the wait for that extra sparkle!
- Thread a ribbon, twine, or string through the hole, and your ornament is ready to shine on the tree or anywhere that needs a little holiday cheer.
Pro Tip: Never pour plaster down the drain—Santa doesn’t need plumbing problems this season!
Why DIY with DAP Canada?
From adhesives to spackling, our products make DIY effortless, durable, and downright fun. Plus, there’s something extra satisfying about saying, “Oh, this? I made it.”
So, grab your supplies, turn up the holiday tunes, and craft something truly magical. Remember to share your creations with us on social media by tagging us @dapcanada—we can’t wait to see what you dream up!
Happy crafting, and here’s to a season filled with creativity and joy!

